《THE SILVINA PROJECT PART》
教程来自:
英国伦敦3D艺术家Şefki Ibrahim
翻译:
CG模型网-嘉儿
Hey guys!
I'm very happy to finally present the first installment in my biggest endeavour this year.
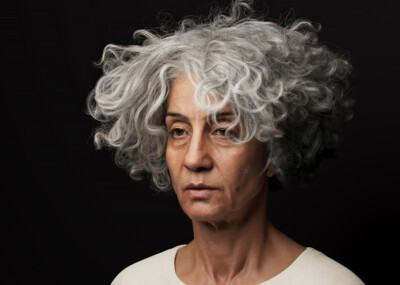
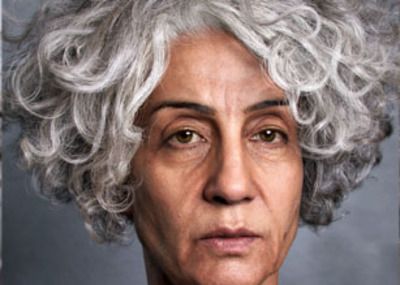
In April, the team at Sample and Hold (https://anewdesign.studio/) scanned a lady named, Silvina. My role was to take this photogrammetry data and transform her into a high-quality digi-double for both offline and real-time rendering. This series will focus on the process for the offline renders.
The first part covers how I worked with this data including the modelling and the clean-up process. I hope that this information gives you all a good insight into how I approach scan data as I know it's been something a lot of people have been asking me about.
Look forward to sharing more and see you guys in the next part, which will be about eyes and teeth!
大家好!
4月,Sample and Hold团队扫描了一位名叫西尔维娜(Silvina)的女士。
我的任务是获取此摄影测量数据并将其转换为***的digi-double,以进行离线和实时渲染。本系列将重点介绍脱机渲染的过程。
第一部分介绍了我如何使用这些数据,包括建模和清理过程。
我希望这些信息能使您对我如何处理扫描数据有一个很好的了解,因为这是很多人问过我的问题。
software:
Maya、R3DS Wrap、Mari、ZBrush
PART 1
《THE SILVINA PROJECT》
PART 1: Using Scan Data
This project was a collaboration with me and A New Design Studio.
We held a photogrammetry session with a lady named, Silvina
back in April and I was provided with her head scan, the albedo
and albedo with spec map,a collection of high-quality reference
photographs and a head base mesh.
《西尔维娜项目》
第1部分:使用扫描数据
这是我和A New Design Studio的合作项目。
我们给一位名叫西尔维娜(Silvina)的女士进行了摄影测量(photogrammetry)
早在四月,
我得到了她的头部扫描图,
一组***albedo与albedo + spec map的参考图照片和头部基础网格mesh。

The head base mesh looked as follows.
My job was to remodel areas of the face, redirecting the edge flow in some areas as well as reducing the resolution in thelesser-seen areas such as the back of thehead and increasing the resolution around the eyes, nose and mouth.
头部的基础网格看起来如下。
我的工作是重塑脸部的区域,将一些区域的布线重新定向,同时降低后脑勺等较隐蔽的区域的**度(分辨率resolution),
增加眼睛、鼻子和嘴巴周围的**度(分辨率resolution)。


The finalised base mesh was wrapped onto the scan in R3DS Wrap making sure to match the features with the topology.
For example, the edge loops that surround the nose and mouth represent the nasolabial fold.
最终确定的基础网格在R3DS Wrap中被包裹到扫描模型上,确保特征与拓扑结构相匹配。
例如,围绕着鼻子和嘴巴的边缘圈代表了鼻唇部的褶皱。


Once wrapped, both the base and scan were imported into ZBrush. It's not as simple as just projecting the scan onto the model.
You can see from looking at the scan that there are a lot of artefacts around the ears and nostrils, so the process involves masking and projecting onto the model bit-by-bit.
包裹好后,将底座和扫描图都导入到ZBrush中。这并不像仅仅将扫描图投影到模型上那么简单。
你可以从扫描中看到,耳朵和鼻孔周围有很多伪影,所以这个过程涉及到蒙版和投影到模型上逐个位的蒙版。

Masks are always blurred to make sure that the projection is smooth and transitions onto the model cleanly.
For parts of the face that the wrap process didn't match exactly, I simply use the move tool to manually reposition areas to align with the scan and then project.
遮罩总是模糊的,以确保投影的平滑和干净地过渡到模型上。
对于包覆过程中没有完全吻合的部分,我只需使用移动工具手动调整区域位置,使其与扫描结果一致,然后进行投影。

头型流程-GIF效果演示-
To start,I paint a large mask exposing most of the face and masking out the cavities and the hair.I then project at the lowest subdivision so the model takes the shape of the scan.
Ithen slowly work my way up subdivision levels masking individual areas and projecting.
首先,我画了一个大的蒙版,把大部分的脸部暴露出来,并把空腔和头发遮住。
然后再慢慢地向上分层,把个别区域遮盖起来,再进行投影。

If I decided to project all at once, not only would the model pick up the unwanted artefacts in the scan, but the cavity areas of themodel such as the eyes, nostrils, mouth and ears would result in large spiky errors that are hard to get rid of.
如果我决定一次投射,不仅模型会把扫描中不需要的伪影捡起来,而且模型的空腔区域,如眼睛、鼻孔、嘴巴、耳朵等都会产生较大的尖状误差,难以去除。
The idea is to do the main projection at a low subdivision level. The higher subdivision levels are for including some of the finer detalls from the scan but most of these are small artefacts, so I have to be careful not to project those.
我的想法是在低分层做主投射。较高的细分级别是为了包括扫描中的一些更**的细节,但是其中大多数都是小的伪像,因此我必须小心不要投射出这些细节。

You can see I' ve decided to pick some subtle details from the neck, eyes and lips but everything else is left smooth at this point.
你可以看到我已经决定从颈部,眼睛和嘴唇中选择一些细微的细节,但此时其他的东西都保持平滑。

Building the ear耳朵的构建
-GIF效果演示-
Once I'm happy with the projection,I begin to sculpt areas using the head scan and photographs as reference.You can see below how I sculpted the ears and tweaked the shape of the eye to accommodate for the eyeball and caruncle geometry.
一旦我对投影满意了,我就开始用头部扫描和照片作为参考,雕刻一些区域。
你可以在下面看到我是如何雕刻耳朵和调整眼睛的形状以适应眼球和耳廓的几何形状。

上图:扫描耳朵
下图:修改后的最终造型
The look of the eye is very important.I always have an eyeball geometry appended in the scene to ensure I am sculpting around the shape to avoid clipping between the two geometries.
眼睛的外观是非常重要的,我总是在场景中附加一个眼球的几何图形,以确保我是围绕着该形状进行雕刻,避免两个几何图形之间的剪切。

To work on trickier areas like the corners of the mouth,l used the mask lasso tool in the morph-UV mode to mask and polygroup separate areas. This way it is easier to isolate sections and work on those without distrubing the rest of the sculpt
为了处理一些比较棘手的区域,比如嘴角,我使用了“变形-UV”模式下的“遮罩套索”工具遮罩和多组分开的区域,
这样可以更容易隔离出一些区域,在不影响到其他的雕塑的情况下处理这些区域。

-GIF效果演示-
To work on trickier areas like the corners of the mouth,l used the mask lasso tool in the morph-UV mode to mask and polygroup separate areas. This way it is easier to isolate sections and work on those without distrubing the rest of the sculpt
为了处理一些比较棘手的区域,比如嘴角,我使用了“变形-UV”模式下的“遮罩套索”工具遮罩和多组分开的区域,
这样可以更容易隔离出一些区域,在不影响到其他的雕塑的情况下处理这些区域。

Like the model, the diffuse texture also needed to be cleaned.This process was done within Mari.
I started by painting out the hair as well as the clothes on her shoulders and proceeded by painting out any artefacts.
I also painted an eyebrow mask and reduced its opacity a litle, which I find allows the XGen hair to blend into the skin better.
和模型一样,漫反射的纹理也需要清理。这个过程是在Mari内部完成的。
我先把头发和她肩膀上的衣服都画出来,然后再画出任何手工艺品。
我还画了一个眉毛 mask,并降低了不透明性,我发现这样可以让XGen的头发更好地融入皮肤。

The look of the diffuse map was further corrected, which I will demonstrate in a later part
漫反射贴图的外观得到了进一步校正,我将在后面的部分中演示

I like to create a procedural layer in Mari to tile red veins like so and reduce the opacity ro around 10-15%.
我喜欢在Mari中创建一个程序层,以平铺红色静脉,并降低10-15%左右的不透明度。
.jpg")

face(From initial wrap to final clean-up (with a teaser of some detailing))
脸部(从最初的包裹到最后的清理(附一些细节的预告))

PART 2:Teeth
THE SILVINA PROJECT
PART 2:Teeth
西尔维娜项目
第2部分:牙齿
Teeth and gums base mesh is a unified geometry.I' ll be using maps to distinguish the two materials.
牙齿和牙龈base mesh(基础网格)是一个整体模型,我将用两种材质贴图来区分。


The scan is shown above.
The base mesh was wrapped onto the scan and then projected in ZBrush and cleaned up. The upper and lower UV's are also shown respectively.
扫描如上图所示。
将base mesh(基础网格)包裹在扫描得到的模型上,然后在ZBrush里进行清理。整个牙上部和下部的UV也分别显示了。

I then carefully painted masks for the top and bottom teeth inside of ZBrush to differentiate between the gums and the teeth.
This mask would later become instrumental in the look-dev process when trying to create convincing materials.
然后,我在ZBrush里面仔细地给上下牙齿涂上mask蒙版,以区分牙龈和牙齿。
这个mask蒙版在后续的设计过程中将会发挥重要作用。

A general base layer was painted in Mudbox by colour-picking from the reference.
Then Iprojected onto the front 4-6 teeth usingthe cross-polarised photo provided.
Some procedural veins were added to the gums in Mari.This was repeated for the bottom set.
通过从参考中进行选色,在Mudbox中绘制了一个普通的基础层。
然后我使用提供的交叉极化照片将其投射到前4-6个牙齿上。
在Mari里,给牙龈添加了一些程序性静脉纹理,对下组重复进行此操作。

Once the base was finalised,I started adding spherical geometry between the teeth to resemble saliva.
基础模型确定后,我开始在牙齿之间添加球状的几何形状,使之与唾液相似。

Breakdown of the maps for the teeth.
My thought process when creating these maps was to emulate the look of saliva, which is very apparent in the reference images.
I wanted the specular to not only be broken up by the detall from the scan but also a weight map, which would create these random saliva-like patterns. These effects were done procedurally in Mari.
牙齿贴图的细分。
在制作这些地图时,我考虑的是模仿唾液的样子,在参考图片中这点非常明显。
我希望specular 里不仅要有扫描图的细节,而且还要有一个权重图,这样就会产生这些随机的类似口水的图案。
这些效果都是在Mari中通过程序化的方式完成的。


When testing, the subsurface is crucial in creating a realistic teeth shader. As you can see from the images above, using the same render settings, the diffusion model creates harsh shadows between each tooth, whereas randomwalk eliminates(most of) the shadowing, which is more accurate.
It also resembles the glassy coating, also known as enamel.
I also tested randomwalk v2, which is very similar but has a little more shadowing than I would have liked.
测试时, subsurface是创建一个逼真的牙齿着色器的关键。
从上面的图片中可以看到,使用相同的渲染设置,diffusion model 会在每个牙齿之间创建粗糙的阴影,
而randomwalk随机游走会消除(大部分)阴影,这更加准确。
它也类似于玻璃涂层,也称为搪瓷。
我还测试了randomwalk v2,它非常相似,但是阴影比我想要的多。
-----------------------------------------------------------------------------
教程外补充
subsurface:次表面散射(SSS)模拟光线进入对象并在其表面下散射的效果。
常用于大理石、皮肤、树叶、蜡、牛奶等材质的真实再现
-----------------------------------------------------------------------------

Harsh shadows/丑陋的阴影
.jpg")
A high value for ray depth diffuse to clean any noise and shadowing that occurs between teeth or from the saliva geometries
对深度的漫反射采用较高的射线值可以清除牙齿之间或唾液几何形状中产生的一些噪波和阴影。
The tongue was re-used from a previous project and manipulated to match the reference.
I projected the provided cross-polarised imagein Mudbox and used this map to derive all the other maps within photoshop by applying filters and some hand painting.
After creating the tongue's bump map, this was applied inside of ZBrush as displacement and then exported out as a displacement map that would work inside of Arnold.
舌头是在之前的项目中的,重新使用,并对其进行了操作,以匹配。
我在Mudbox中投射出了提供的交叉极化图像( cross-polarised imagein ),
然后用这个贴图在Photoshop中通过应用滤镜和一些手绘来推导出所有其他的贴图。
在创建了舌头的凸点贴图后,在ZBrush中应用了置换,然后导出为置换贴图(displacement map),在Arnold中工作。

Siting the teeth inside the base mesh with a smile blendshape applied to test the teeth inside a cavity.
These images are using HDRI lights in the ACES colour space.
将牙齿放置在base mesh内,应用smile blendshape(微笑混合器)的形状来测试牙洞内的牙齿。
这些图像都是在ACEScolour space中使用HDRI灯。
-------------------------------------------------------------------------------------------
教程外补充
什么是blendshape?
答:单个网格变形以实现许多预定义形状和任何数量之间组合的技术,在Maya/3ds Max 中我们称它为变形目标,例如单个网格是默认形状的基本形状(例如无表情的面),并且基本形状的其他形状用于混合/变形,是不同的表达(笑、皱眉、闭合眼皮),这些被统称为混合形状或变形目标。
如何使用 Blend Shape 制作表情呢?
答:要在 Maya 或者3ds Max 里面制作一个含有 Blend Shape 的形变动画 Avator。
把Avator导入到 Unity 中给预制的 Avator 添加组件代码这里我们叫 BlendShapeDemo.cs,来控制 Avator 的表情变化。代码如下:
using System.Collections;using System.Collections.Generic;using UnityEngine;public class TestBlendShapeBehaviour : MonoBehaviour {
int blendShapeCount;
SkinnedMeshRenderer skinnedMeshRenderer;
Mesh skinnedMesh;
void Awake ()
{
skinnedMeshRenderer = GetComponent<SkinnedMeshRenderer> ();
skinnedMesh = GetComponent<SkinnedMeshRenderer> ().sharedMesh;
}
void Start ()
{
blendShapeCount = skinnedMesh.blendShapeCount;
}
void OnGUI()
{
//21,是指模型中设定发生形变张开嘴巴 0:左眼闭合 1:右眼闭合
if (GUI.Button (new Rect (100, 100, 150, 80), "张开嘴巴 && 闭眼")) {
skinnedMeshRenderer.SetBlendShapeWeight (0, 100);
skinnedMeshRenderer.SetBlendShapeWeight (1, 100);
skinnedMeshRenderer.SetBlendShapeWeight (21, 100);
}
if (GUI.Button (new Rect (100, 200, 150, 80), "闭合嘴巴 && 睁眼")) {
skinnedMeshRenderer.SetBlendShapeWeight (0, 0);
skinnedMeshRenderer.SetBlendShapeWeight (1, 0);
skinnedMeshRenderer.SetBlendShapeWeight (21, 0);
}
}}
SkinnedMeshRenderer就是含有 blendshapes 列表的渲染器,实施更改其中的权重,来改变其中的表情。
作者:——慕久久
来源:——简书
-------------------------------------------------------------------------------------------
教程外补充
ACEScolour:影视方向常见系统。
颜色编码系统,是数字时代电影制作,母版制作和存档的新基础。能使视频调用的色彩管理快速符合高端数字影院工作流程。
软件:达芬奇
-------------------------------------------------------------------------------------------


-GIF效果演示-
本篇教程翻译工程比较大(其实是英语水平不够),加上需要搜集些周边资料,将连载翻译,并分三部分(上中下)三次发出。
下期待译内容:眼睛+皮肤细节和Arnold阿诺德中的皮肤着色处理
下下期待译内容:毛发处理-眉毛、睫毛和面部毛发、头发
为了推送更多干货资源,我们增加了一个微信订阅号CGMODEL,有兴趣的可以先关注!也可以等养肥了再看~
订阅号内容是出现在 {订阅号消息} 框内,平时不会打扰到大家。
后续部分包含其他待译教程,将在微信公众号CGMODEL内提前更新。
翻译的文章在版权上来说是不属于原创的, 因此我们没有做原创标注!转载请注明出处!
下期再见~❥(^_-)
声明:该资源由发布人:【微信小编】上传,点击查看作者主页其他资源。
CG模型网(cgmodel.com)内网友所发表的所有内容及言论仅代表其本人,并不反映任何CG模型网(cgmodel.com)之意见及观点。